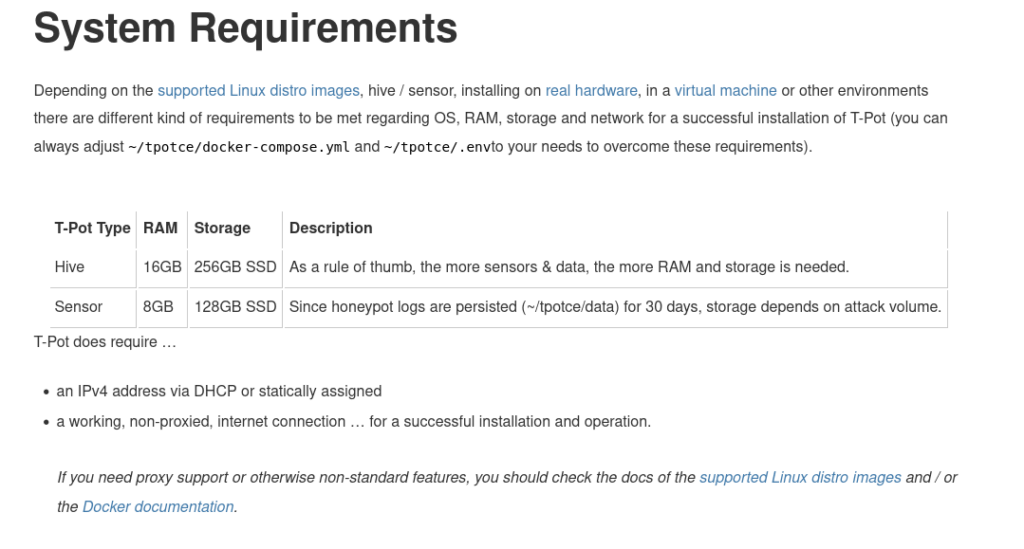
System reqs for 24.04 are now 16GB RAM & 256GB of storage- https://github.security.telekom.com/2024/04/honeypot-tpot-24.04-released.html#system-requirements
When I first set out to install T-POT it seemed like an easy installation. I attempted to follow MyDFIR’s awesome video, & set up my Vultr account using his link with the $100 credit. Unfortunately after several attempts I couldn’t get it to work. Seems like I was 3 months late & the new version of T-POT 24.04 no long works with the ISO. Also, whereas the previous version needed 8G RAM & 128GB storage, 24.04 now needs 16G RAM & 256GB of storage. Balls!
Still, I tried setting it up on the old spec requirement & it just would not work. It would not install. The pricing on Vultr & the other cloud services for a 16GB RAM shared cloud hosting hovered somewhere around $80 mo. Even with the credits that was cost prohibitive.
Self Hosting?
In my home lab I had a Beelink Mini PC sitting around doing nothing that had the specs, Intel EQ12 (4C/4T), 16G RAM, & I’d already put a 1TB SSD in it. It also had dual 2.5GB LAN’s. So I thought lets try it!
I was able to get T-POT installed, but I could not get it to work, had trouble accessing it, & the docker containers kept shutting down.
In my haste I’d ignored 2 crucial things about the new version:
- Supported distros: I saw “Ubuntu” & went full speed ahead with Ubuntu Desktop. But that’s not what it said, it says “Ubuntu Live Server”.
- The creator warned me against using dual LAN hardware, but I ignored it seeing as I never had a problem running anything else on a dual LAN mini.
T-Pot is designed to only run on machines with a single NIC. T-Pot will try to grab the interface with the default route, however it is not guaranteed that this will always succeed.
At best use T-Pot on machines with only a single NIC. – https://github.security.telekom.com/2024/04/honeypot-tpot-24.04-released.html#system-requirements
After some re configuring of my lab, I freed up a different Beelink with similar specs & a single LAN. Shook off all my failed attempts, installed Ubuntu Server, then the T-POT installation script & viola! It worked!
I had it up & running on my office LAN.
Yep, I know I could have tried a Proxmox set up, but you’ll see below why I’m glad I went with installing it on it’s own hardware.
Why no traffic? 🤔
My office is on it’s own LAN from the main LAN. So, I had T-POT sitting behind my OPNsense firewall, on a separate LAN. Needless to say I wasn’t getting any attacks.
I needed to get it exposed to the open internet…out on the wild west…past my ISP’s walls & fail safes. I guess the good news is that there was no one roaming around inside my network.
After some searching & reading I discovered that ATT (my ISP) allows port forwarding for gaming, & you can set up your own rules. Instructions are here.
So, I moved the T-POT device onto the main LAN, & started setting up some of the ports. First a few to test, then as I started getting attacks eventually opened them all. Cool!
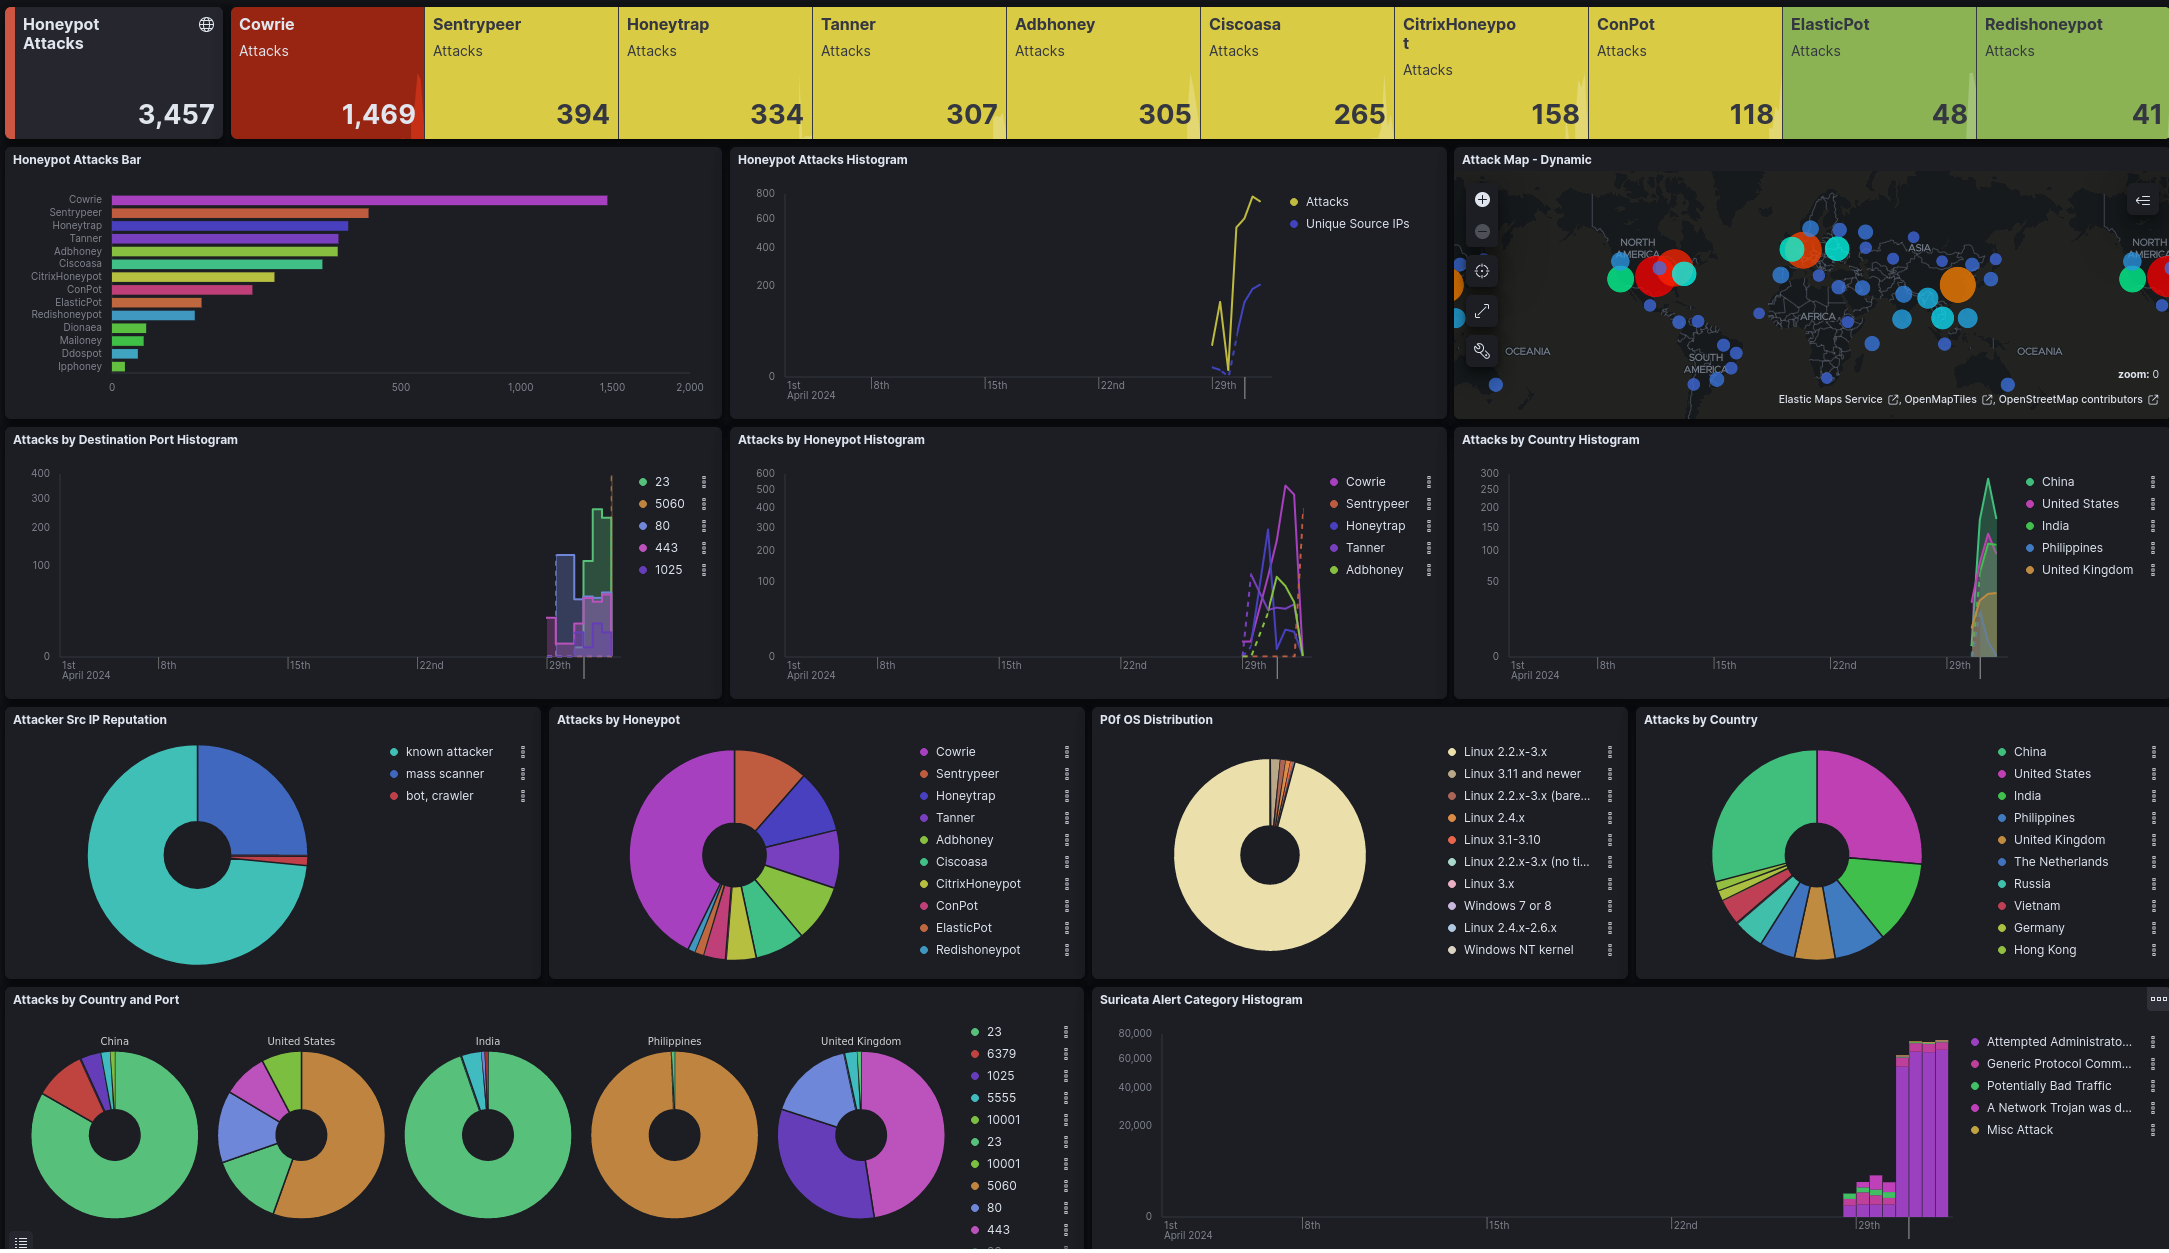
T-POT screenshot- 3 days running
Security!
When you start reading about port forwarding there are all kinds of warnings about how dumb this is if you don’t know what you’re doing. One of the first things suggested is to have your forwarded device on a it’s own LAN. I’m a big fan of isolating things. However, I didn’t have that option at the time as the stock ATT router doesn’t allow for additional LANs or VLANs. I also didn’t have another router to use, & others in the house needed access without me screwing things up & creating a bunch of new hoops to jump through that will have them blank staring at me like I’m explaining the nuances of the Cardassian’s relationship with The Federation.
The nature of how T-POT works is that attackers are conned into thinking access is possible, but there is no access. It’s all a dead end. It also runs in Docker containers. Also ATTs port forwarding options are device specific. Even though I was reasonably confident in all if this, I thought it was a good idea to make sure the the honeypot device could not be accessed or could access other devices on the network. Tested, monitoring, & so far so good. I will install another network monitoring solution on that LAN as well.
OK, great. But how do I access one LAN from a different LAN?
So it’s up & running on 192.xxx.x.x but my office is on 10.x.x.x. How do I set things up so that I can easily see, monitor & access it all from my daily driver (Linux Mint), while keeping my networks isolated from each other?
First I though about installing a browser onto Ubuntu Sever, throwing a monitor & keyboard onto the T-POT device, & go from there. Fine, but still doesn’t solve the main problem of accessing one LAN from another & now I’ve added more things to the mix.
Then I thought I’d use an old laptop that I had sitting around, & just connect it to the other LAN. Didn’t like that either. I wanted to do it all from my existing set up without adding more devices & connections.
It dawned on me that since I’d put the T-POT device on a switch, that I had additional Ethernet ports on that LAN. Using another Ethernet to USB adapter I just connected that second LAN to my computer. I now had access to both LANs from the same desktop. Took me about 2 mins to realize that I couldn’t control which LAN was used when just doing my normal stuff & I wanted all my other actions behind my OPNsense firewall. I considered remote desktop…nah. I tried setting up a script that directed to the specific LAN, nah..it wasn’t reliable & didn’t give me confidence that it wouldn’t fail & I’d never know. I needed another way with more control.
From the Linux toolbar (probably Windows too) you can easily toggle which Ethernet you’re using on the fly. Crude. Easy. It works! Bonus: I actually like having that physical toggle to pick & choose networks.
Still not good enough. I want to see!
So now I have to switch LANs just to monitor my T-POT dashboard? That’s not going to work. I want to watch monitor the dashboard & see all the flashy things monitor for patterns & spikes. I also don’t want to take up valuable screen real estate all day (remote desktop), and didn’t want to set up another monitor on top of the 43″ 4K behemoth I’m already using. I went through all kinds of configurations in my head, most involved adding another computer. I knew there was an easier way.
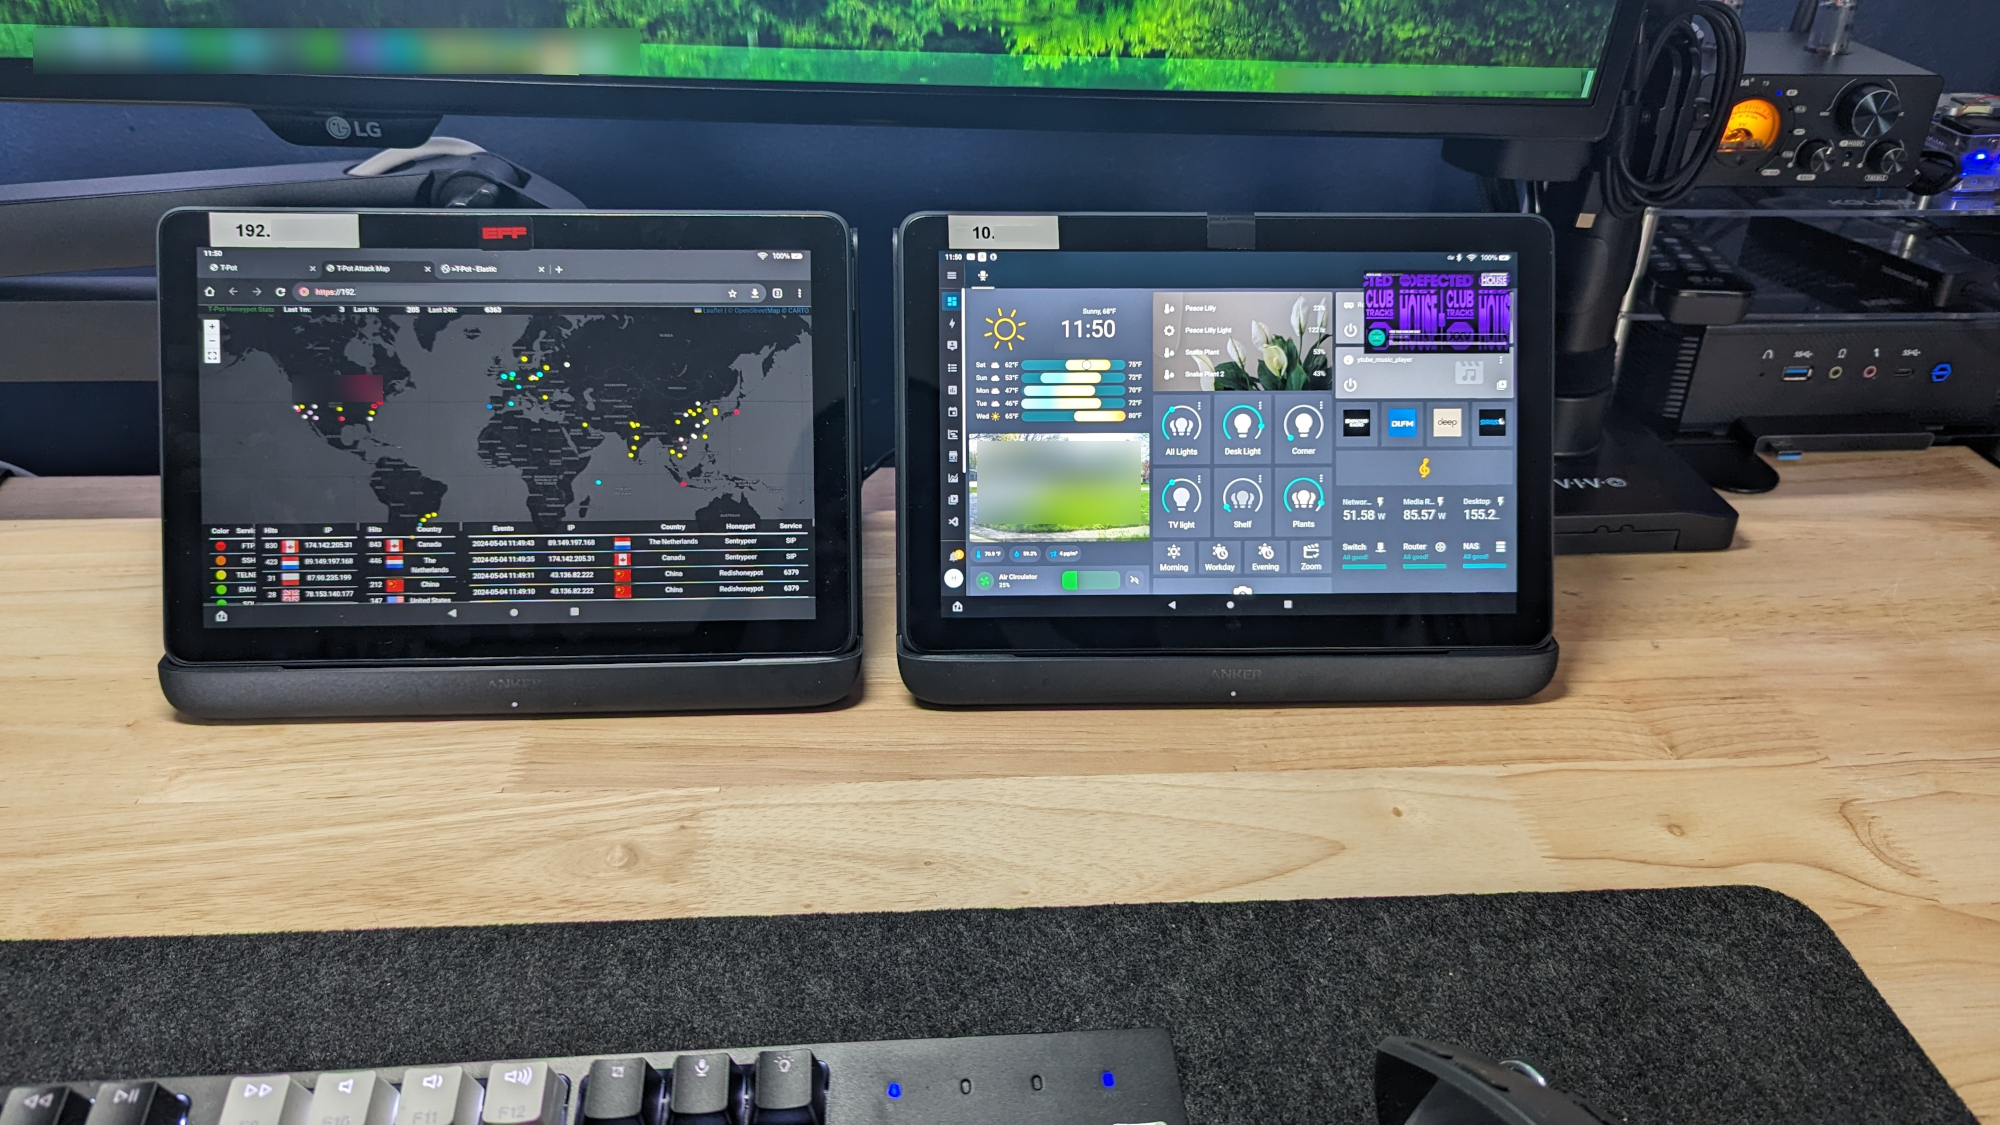
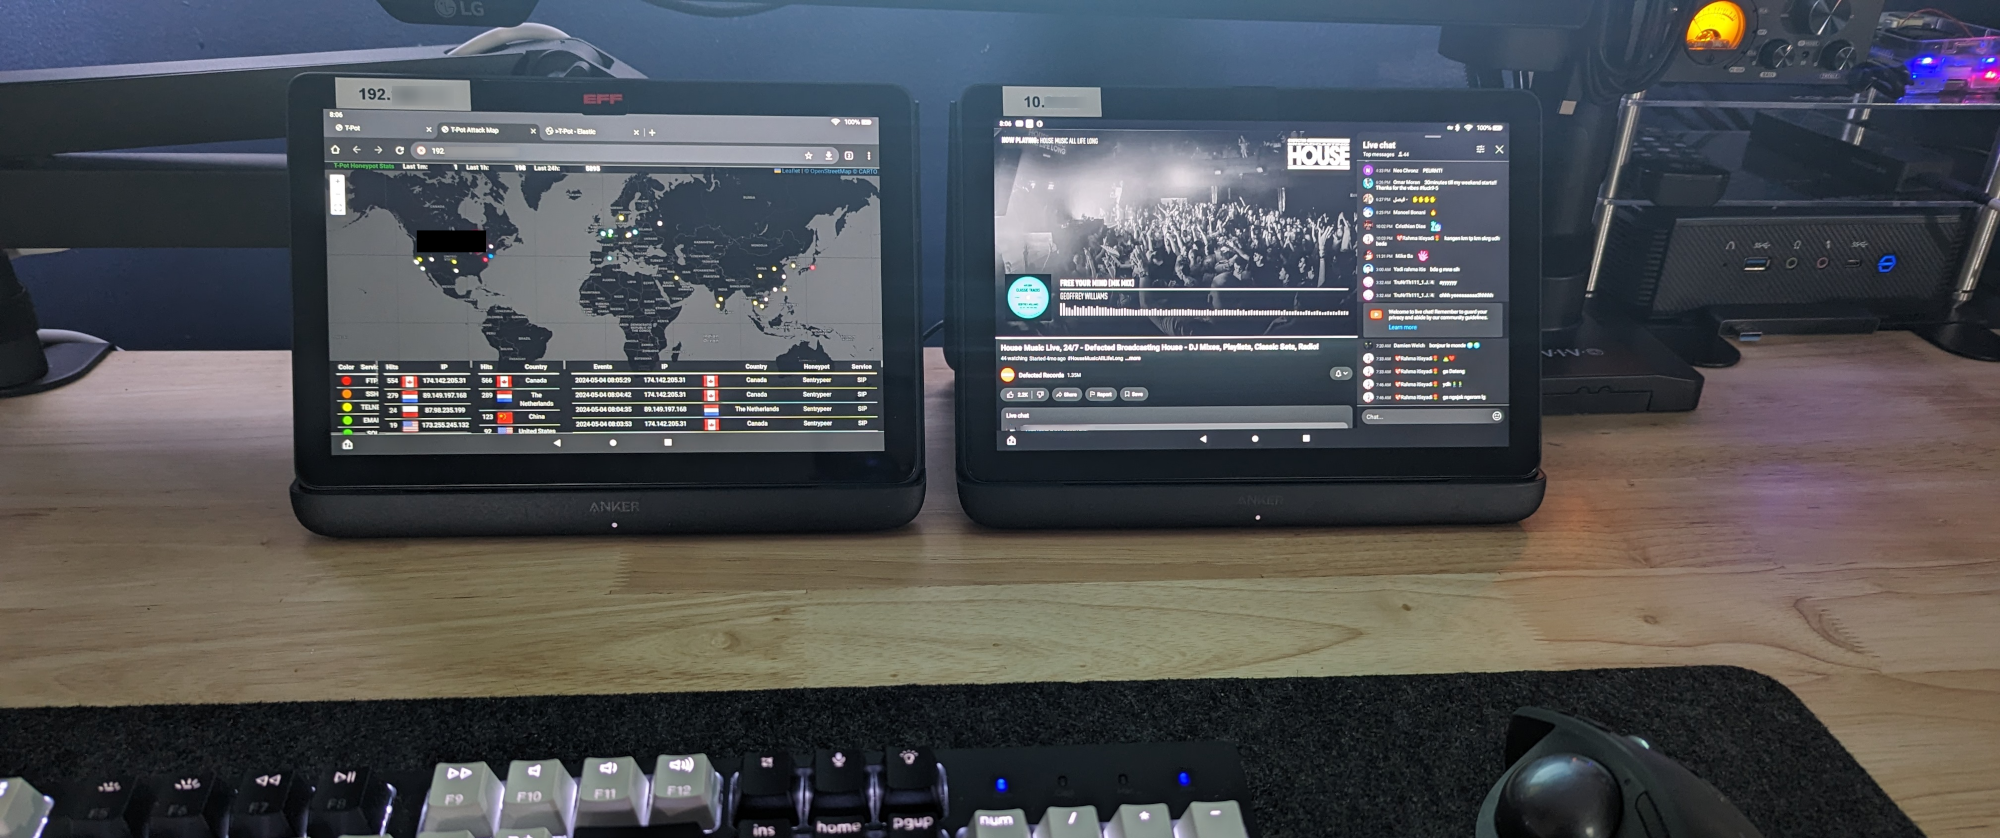
What about tablets?
A while back I’d purchased 2 Amazon Fire 10 Plus tablets, the ones with wireless charging. Why 2? I got one to use as a Home Assistant dashboard. It worked well, so I also started using it as my music streaming device. The wireless charging stand/dock really makes it convenient, I have no idea why Amazon (actually EVERY tablet maker) doesn’t have this. I digress. I liked this Fire tablet so much (using it more than my iPad Mini) that I purchased another as a gift for someone but ended up getting them something else. So I had a 2nd new ( well…renewed) in the box Fire 10 Plus tablet just sitting around.
FYI, I purchased one (new in the box) off eBay as they were out of stock on Amazon when I was looking. Then purchased the 2nd from Amazon renewed. Finding them in stock is hit or miss as they are very popular, even though they aren’t the newest model…which doesn’t have wireless charging. I’m pretty sure I paid less than $100 for one, & about $120 for the other. The wireless charging stands (they only work with this specific Anker stand) are about $32.
I should also add that I installed Google services on them to make them actually usable for something other than Amazon stuff.
-> 📢 Shout out to Smart Home Solver for turning me on to them. <-
What’s Next?
Obviously learning how to use all the tools to monitor, sift through all the data. There are a ton of articles & YouTube videos on setting up T-POT, but very few about what to do next, how to use the data, ideas for integration, automation, & so on & so on. So, I’ll probably be discovering things as I go, trying things, failing, & trying again. Ultimately I’d like to be able to share the data to repositories like Sentry Peer to help others, & a few other ideas. I’ll do my best to keep updating what I’ve learned along the way.

Multi-disciplinary IT support strategist with 15+ years experience empowering entrepreneurs, corporate colleagues and remote teams with the knowledge, skills and technologies to get stuff done. | Sec+ – CySA+ (CSAP) – ITIL – ACSP
Comments are closed.